Create Fall Leaves with Chalk Pastels - Early Childhood Art Activity!

If you're looking for a quick and simple fall craft to complete with your kiddos, check out this idea that was featured on Rockabye Butterfly! With only a few supplies your class can create a beautiful fall leaf display.
Creating Fall Leaves with Chalk Pastels
Suppies Needed:
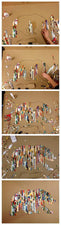
Get started by placing masking tape on the back of each cut-out. Then allow your kiddos to arrange their leaves on the white paper.


Once the leaves are arranged, have students use chalk pastels to color around the edge of each leaf. Make sure they use a variety of fall colors!

Next step will be for your kiddos to use their fingers to smear the pastels together.

To finalize the picture, remove the taped on cut-outs. Voila! A beautiful fall picture. You could easily stop the project here - but if you're not wanting your cut-outs that are now beautifully colored to go to waste, have your students use a brown marker to draw a tree trunk and branches on a separate piece of white paper.

Then simply attach the created leaves.